Layout Manager
Overview
The Mythradon Layout Manager allows System Administrators and Developers to change the layout of fields on forms and lists.
This includes Detail, Edit and List views as well as search filters and fields for mass-update forms. Each entity will have several views already defined.
When a new entity is created it will automatically be provided with default versions of the following views:
- List View
- Detail View
- List (Small) View
- Detail (Small) View
- Bottom Panels
- Search Filters
- Mass Update
- Side Panel (Detail) View
- Side Panel (Edit) View
- Side Panel (Detail Small) View
- Side Panel (Edit Small) View
- Side Panel Fields
The following image shows the list of Views that are automatically generated for a new custom entity.

Access Layout Manager
To access the Layout Manager:
- Select
Administration | Layout Managerfrom the Menu Button - Select the Entity that you wish to edit the Views for
- Select the appropriate View that you wish to edit
- Make the necessary changes and click the
Savebutton.
Note: Once saved the changes will take affect for the current user immediately. Other users will need to either refresh their browser using F5 or simply logout and back in again for the changes to be displayed.
Alternative way of accessing the Layout Manager:
- Select
Administration | Entity Managerfrom the Menu Button - Select the Entity that you wish to edit the Views for
- Click the
Layoutsbutton.

View Types
Most entities have the following View Types available for configuration using the Layout Manager:
- List View
- Detail View
- List (small) View
- Detail (small) View
- Bottom Panel View
- Search Filter View
- Mass Update View
- Side Panel View
- Kanban View
- Side Panel Fields
- Additional Views
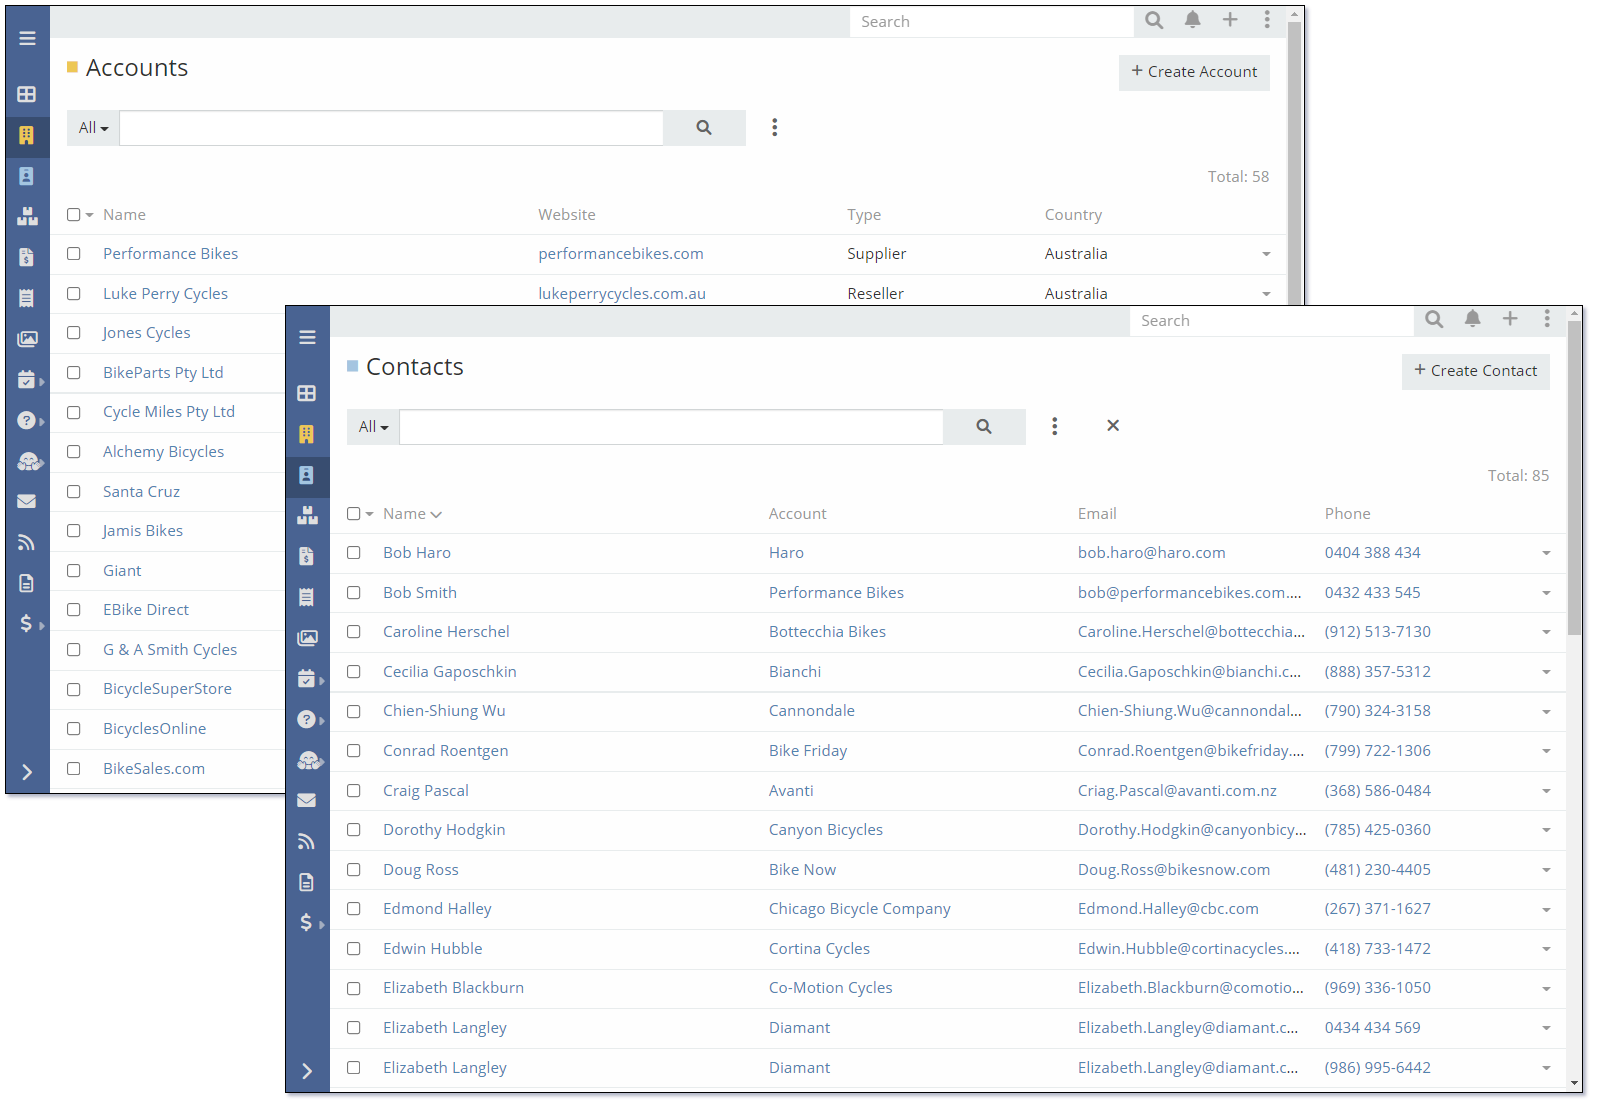
List View
List Views are typically the default view that is displayed when selecting an item from the menu. List Views are designed to display a list of records from the selected entity type. i.e., Account List View or Contact List View.
List View are displayed with a Search/Filter bar at the top that can be used to search or filter the records that are displayed in the list. To set the fields that can be used in the Search/Filter bar refer to the Search Filter View.
The Layout manager allows you to define the fields that are displayed on the List View as well as:
- Order of the fields displayed on the List View
- Column widths of the displayed fields
- Text alignment
- Hyperlinks on fields
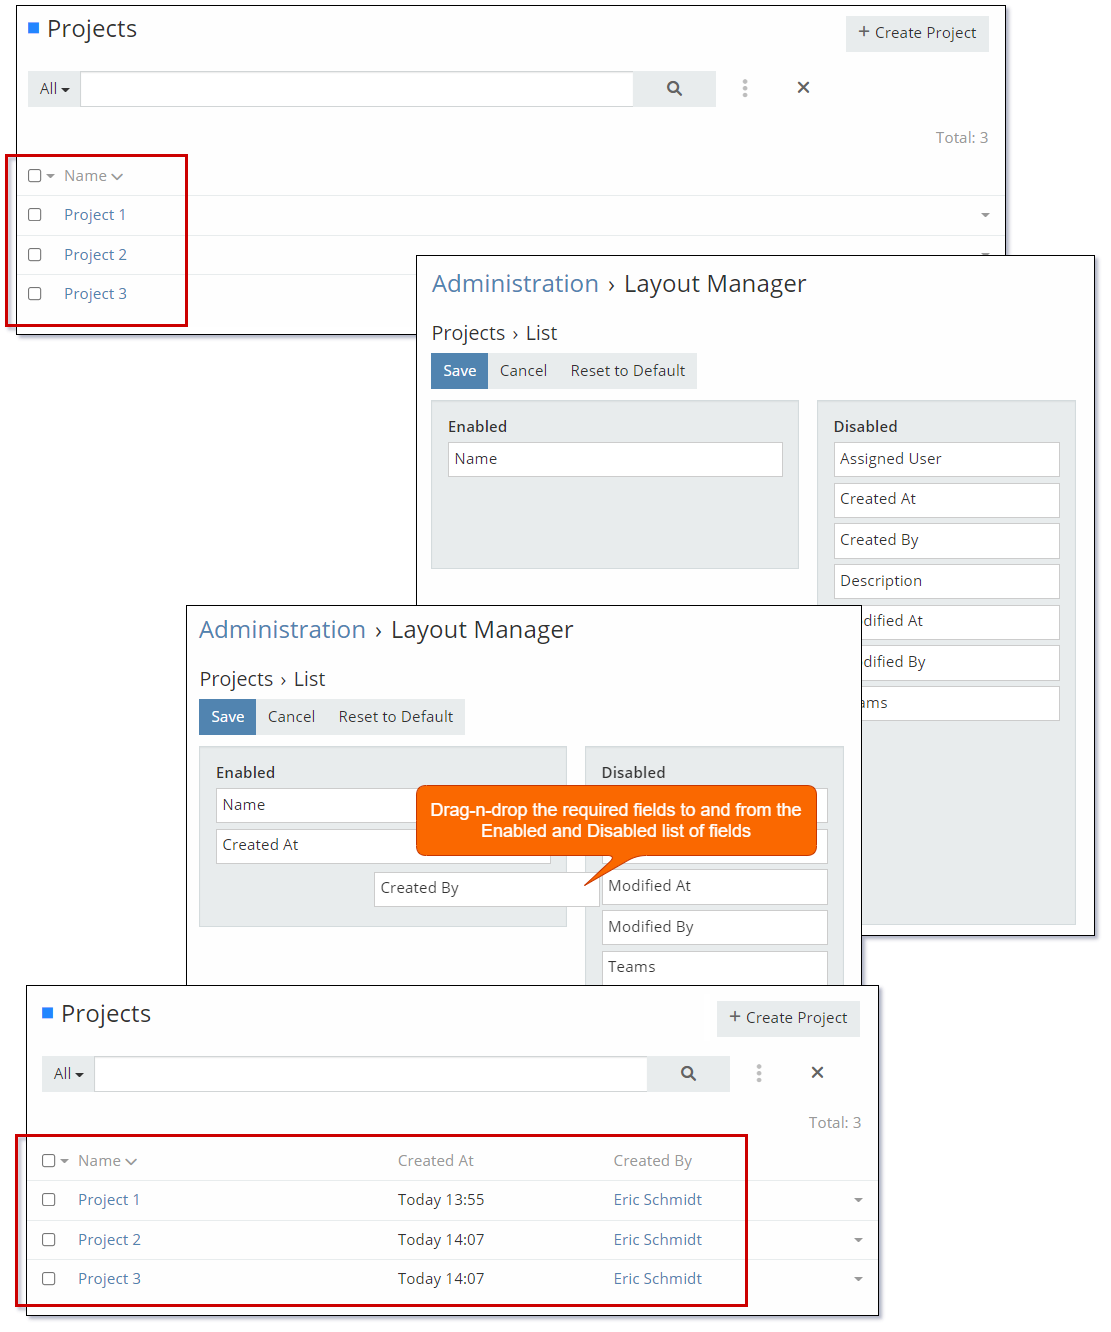
The following image shows how to add fields to a List View by dragging and dropping the fields from the Disabled fields to the Enabled fields. To set the order of the fields, drag-n-drop the fields in the Enabled list to the order required.
Changing the properties of a List View column:
- Click on the edit icon on the appropriate field
- Change the properties as required
- Click the
Applybutton.
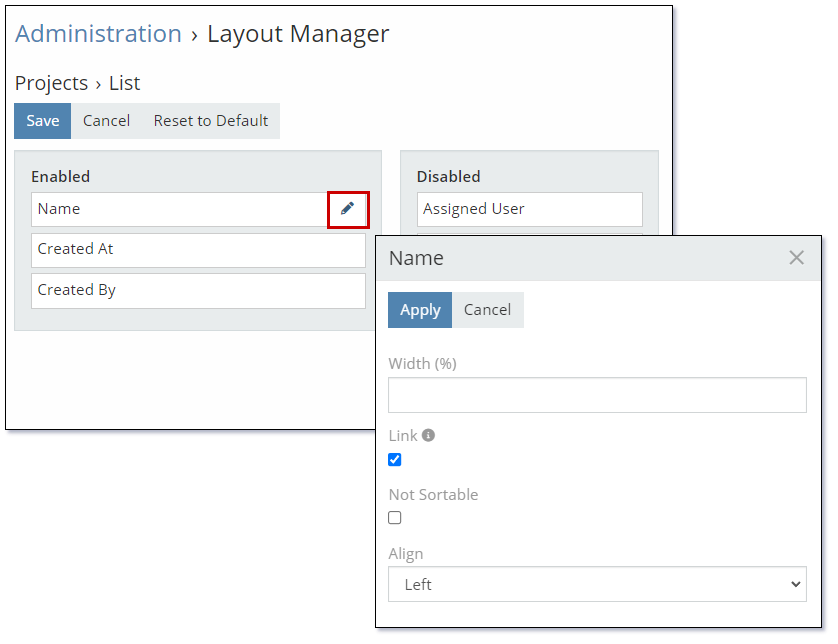
Column Properties
| Property | Description |
|---|---|
| Width (%) | Defines the percentage width that should be applied to displaying the data in the field. |
| Link | If checked, then a field value will be displayed as a link pointing to the detail view of the record. Usually it is used for Name fields. |
| Not Sortable | Controls if the field can be sorted. Sorting is performed by clicking on the column heading in the List View. |
| Align | Controls the text alignment of the displayed data. Available options:
|
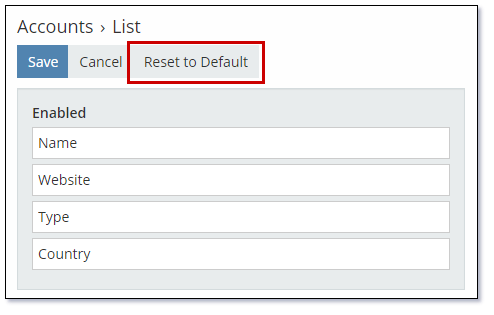
Resetting to Default
At any time you can reset the List View to the default layout by clicking the Reset to Default button as shown in the following image:
Detail View
Detail Views are used for displaying the details of a record. Each entity will have a default Detail View. The Layout Manager allows you to modify each Detail View.
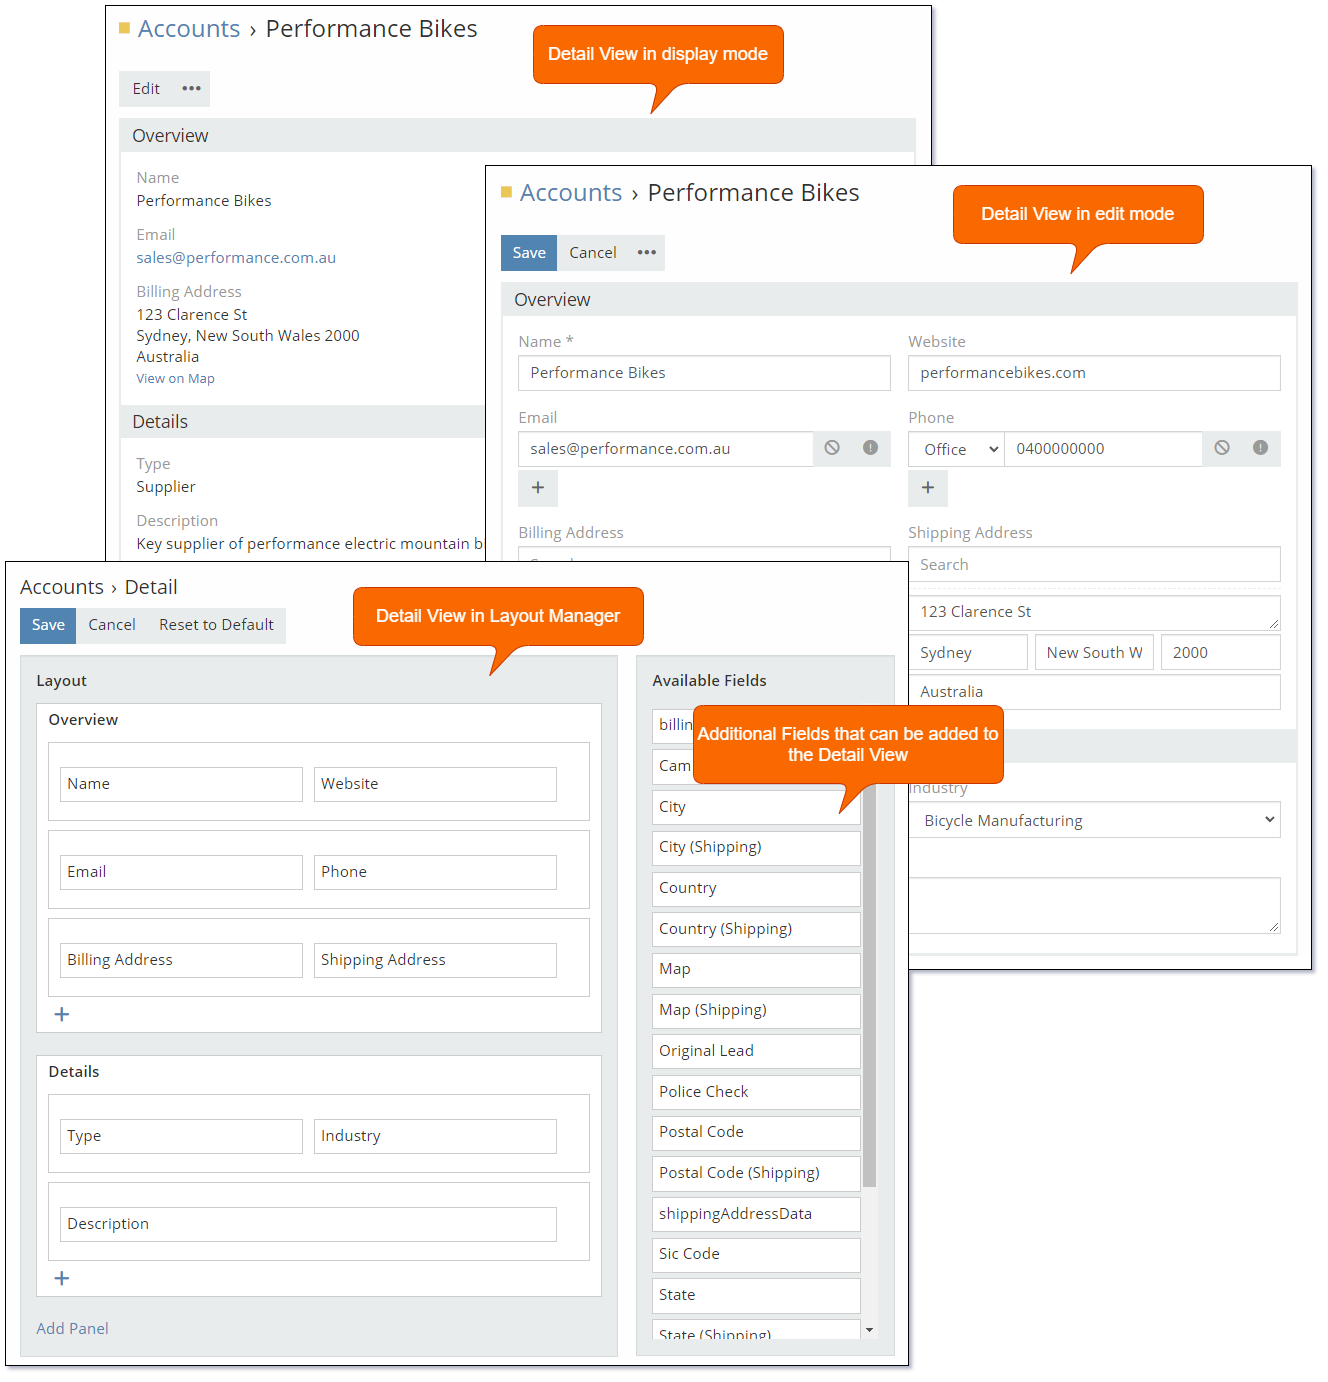
Detail Views consist of the following:
The following image shows the Layout Manager editing a Detail View for a custom Project entity.
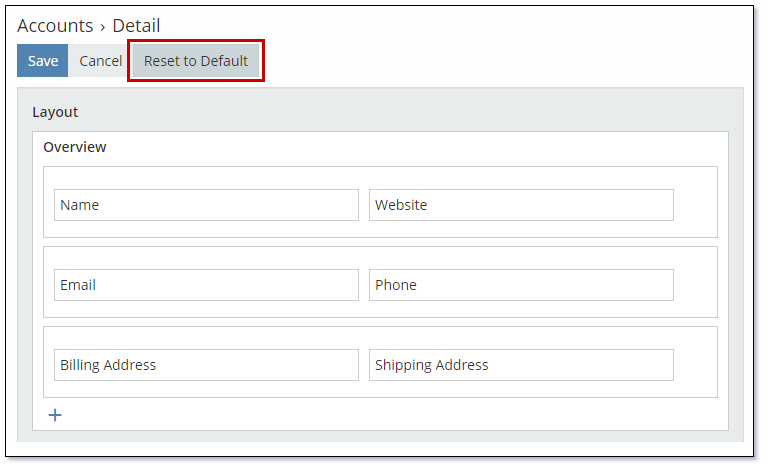
Resetting to Default
At any time you can reset the Detail View to the default layout by clicking the Reset to Default button as shown in the following image:
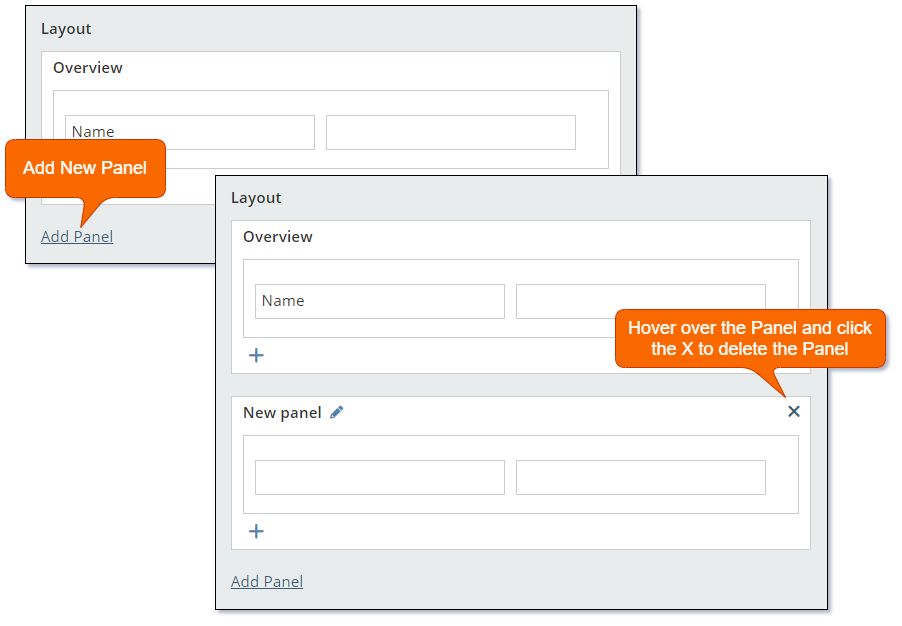
Panels
Detail View Panels are used to group fields into logical sections that are displayed on the view.
A Detail View can contain multiple Panels. As a minimum there must be at least one Panel on each Detail View.
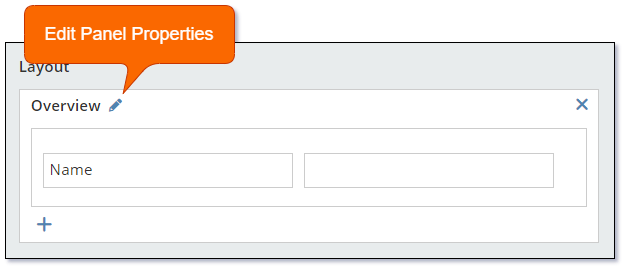
Each Panel has several Properties that can be used to change the display of the Panel. The following image shows how to edit the Properties of a Panel:
Panel Properties
| Property | Description |
|---|---|
| Panel Name | Defines the title/name displayed at the top of the panel. |
| Conditions making panel visible | Conditional logic used to control if a panel is displayed. |
| Style | Style can be used to set the border and title background color of the panel. Available options: 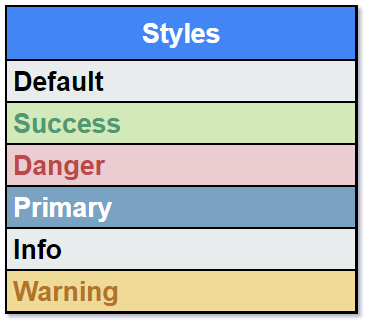 |
| Conditions making style applied | Conditional logic used to control the style that is applied to the panel. This will use the Style as defined in the previous property when the condition is met otherwise the default style will be applied. |
| Hidden | Controls if the panel is hidden. |
When using the Conditions making style applied the style that is applied is the value set in the Style property. This style is only applied if the conditional logic defined in this field equates to true, otherwise the default style is applied. This conditional logic does not allow for setting multiple styles based on different conditions being met in the conditional logic.
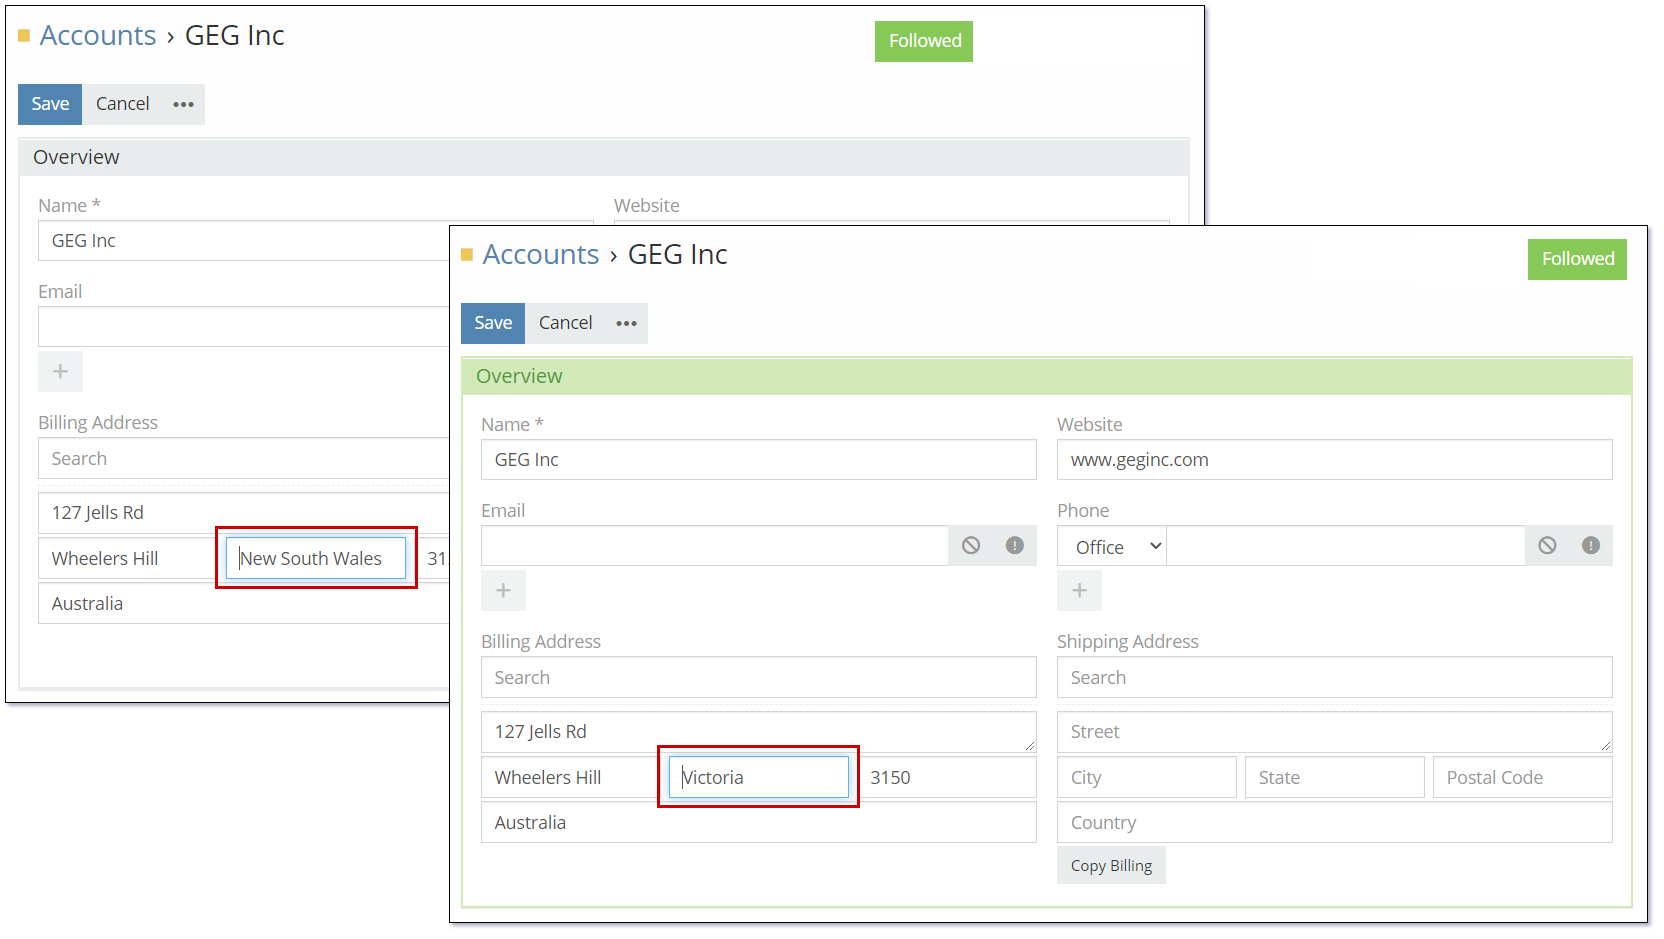
For example the following logic will set the color of the Account Overview Panel to Success (Green) if the State = 'Victoria'.
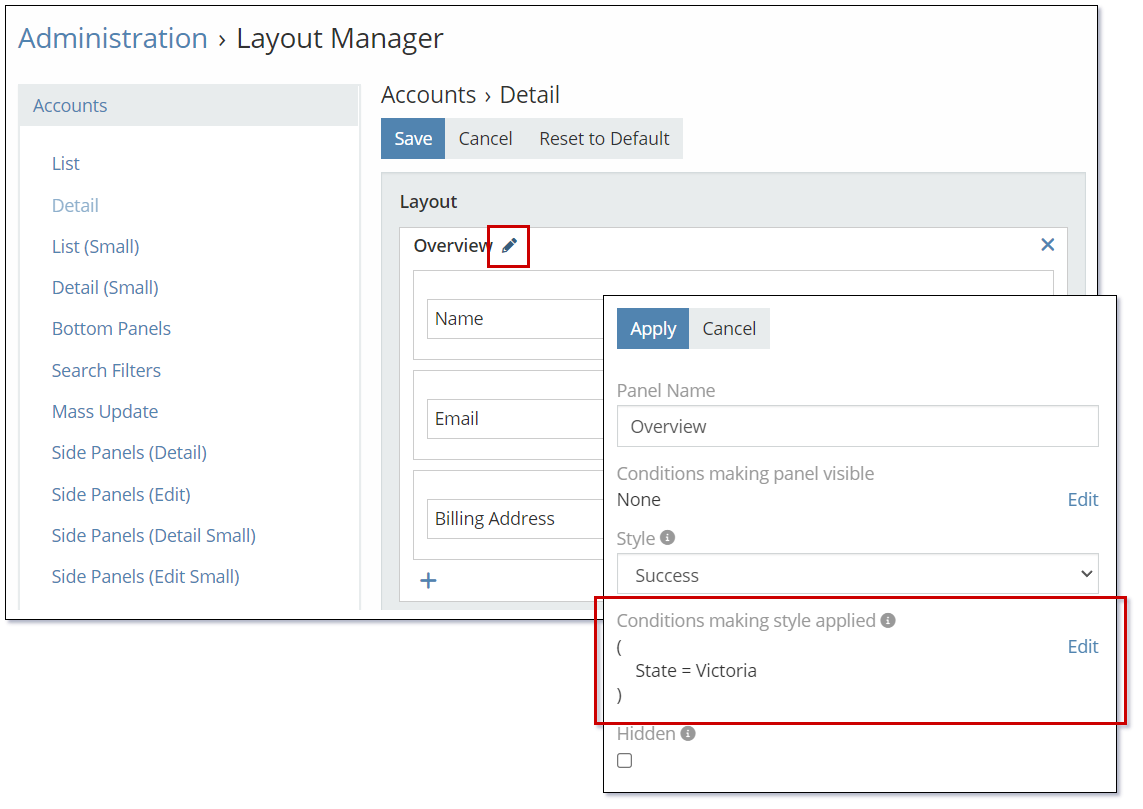
This feature is useful to highlight a Panel with a color only when a specific condition is true.
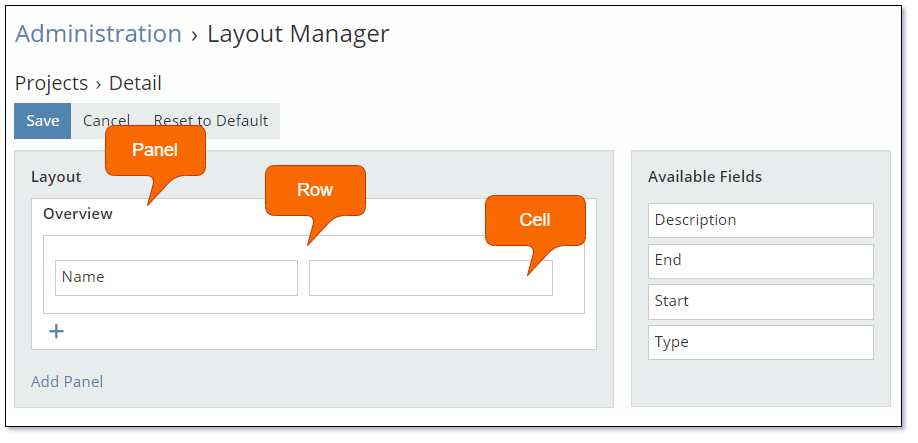
Rows
Within the Panels on Detail Views we have Rows. As a minimum there must be at least one Row within a Panel. Rows are horizontal grouping of Cells.
The following image shows how to add and remove Rows.

Cells
Within the Rows on Detail Views we have Cells. As a minimum there must be at least one Cell within a Row. Cells are place holders for Fields.
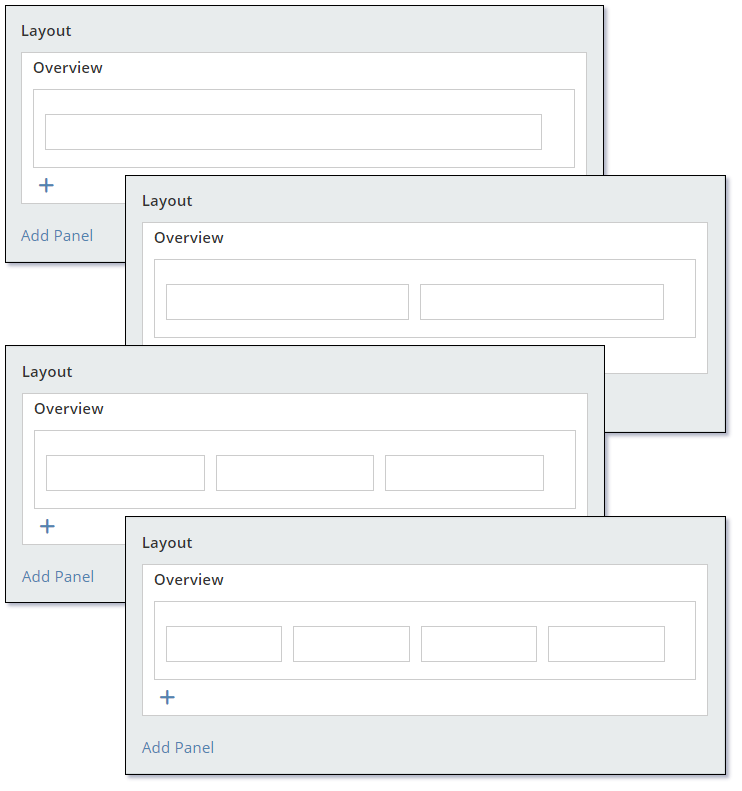
The number of Cells within a Row is either 1, 2, 3 or 4 as shown in the following image:
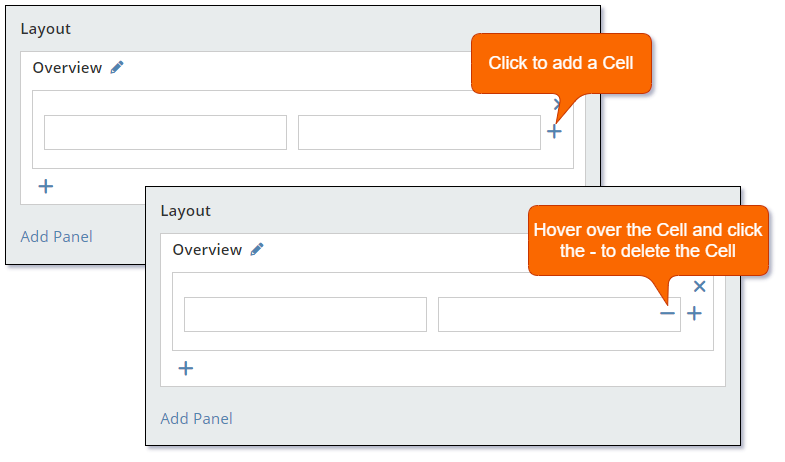
The following image shows how to add and remove Cells from a Row.
Fields
To display a Field on a Detail View you need to drag-n-drop the Field from the list of available fields into a Cell.

As you drag a Field onto a Cell, the border of the Cell will change to a red color when it is ready to accept the Field as shown in the following image:

List (Small) View
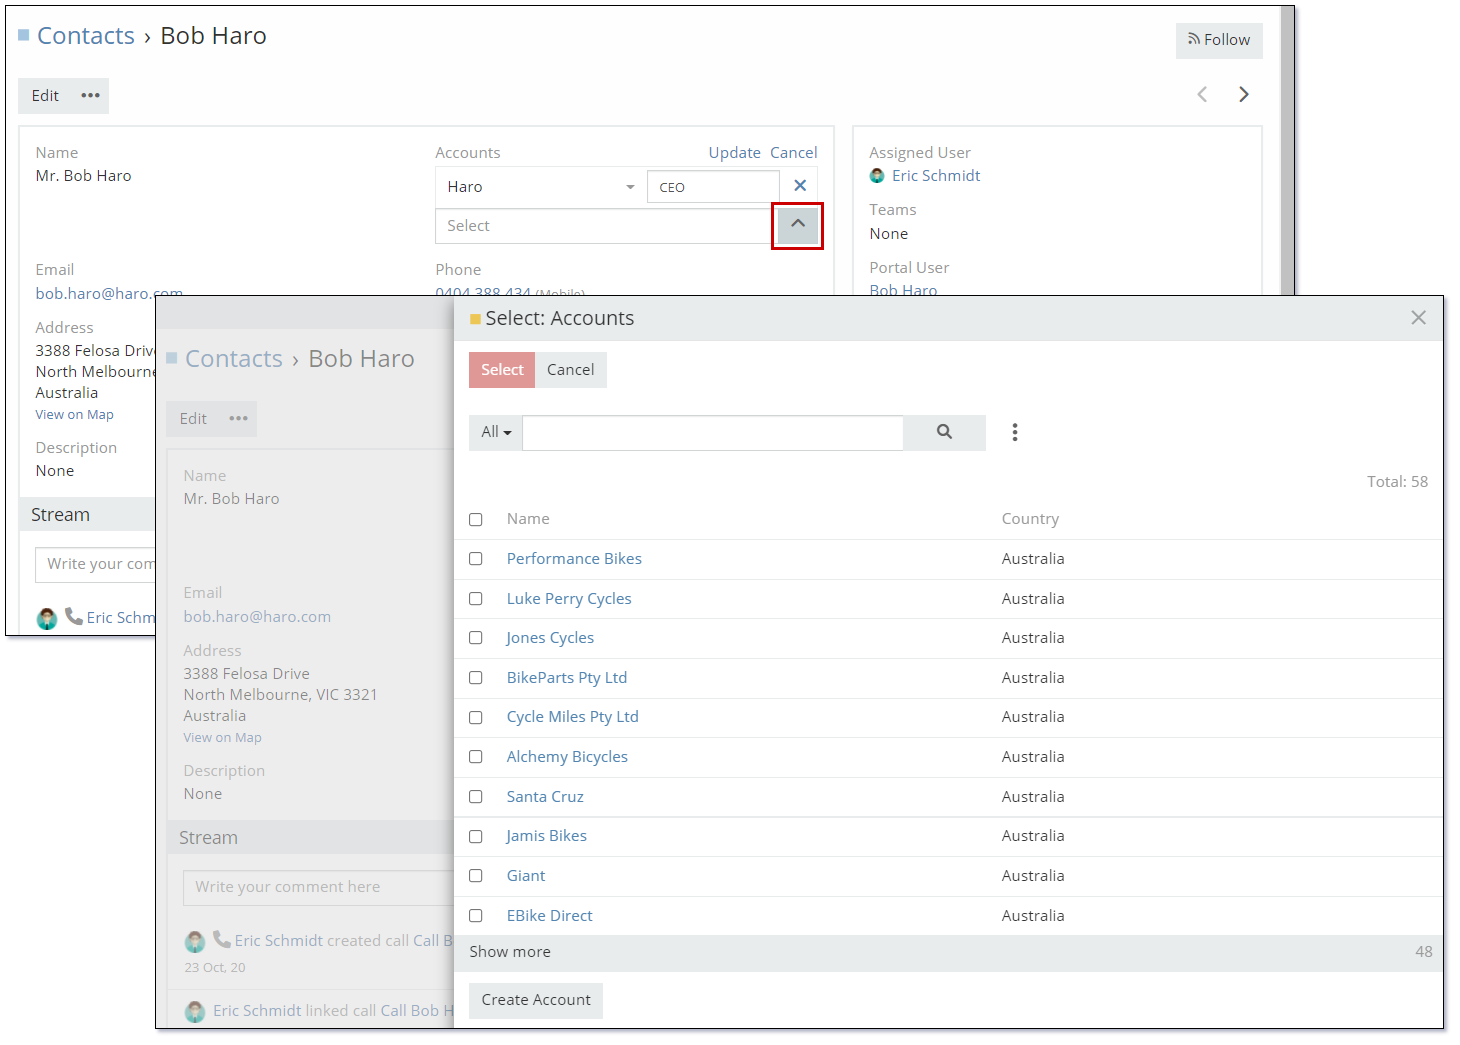
The List (Small) View is a list view that is used in selection dialogs. Selection dialogs are used when selecting a related record. i.e., relating an Account to a Contact.
Selection dialogs are not at wide as List Views so you may want to adjust the number of columns/fields that are displayed.
The following image shows the Account selection dialog that uses the List (Small) View on the Account entity:
Modifying the List (Small) View is identical to the instructions for the List View
Note: Each entity only has one List (Small) View. The fields that you choose for you List (Small) View will be used for all situations where the specific entity selection dialog is displayed.
Detail (small) View
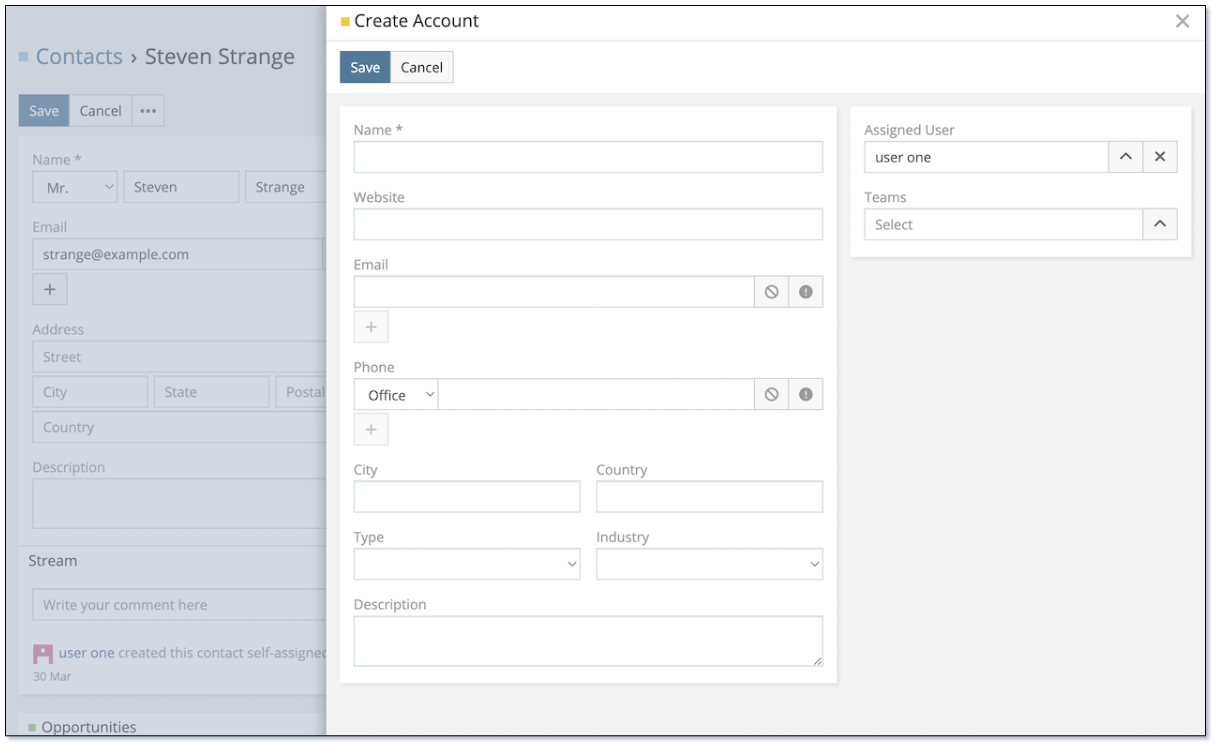
The Detail (Small) View is a detail view that is used when users wish to create a new record of an entity in selection dialogs. Selection dialogs are used when selecting a related record. i.e., relating an Account to a Contact.
Selection dialogs are not at wide as Details Views so you may want to adjust the number of columns/fields that are displayed.
The following image shows the Account selection dialog that uses the Detail (Small) View on an Account record:
Modifying the List (Small) View is identical to the instructions for the List View
Note: Each entity only has one Detail (Small) View. The fields that your choose for you Detail (Small) View will be used for all situations where the specific entity selection dialog is displayed.
Bottom Panel View
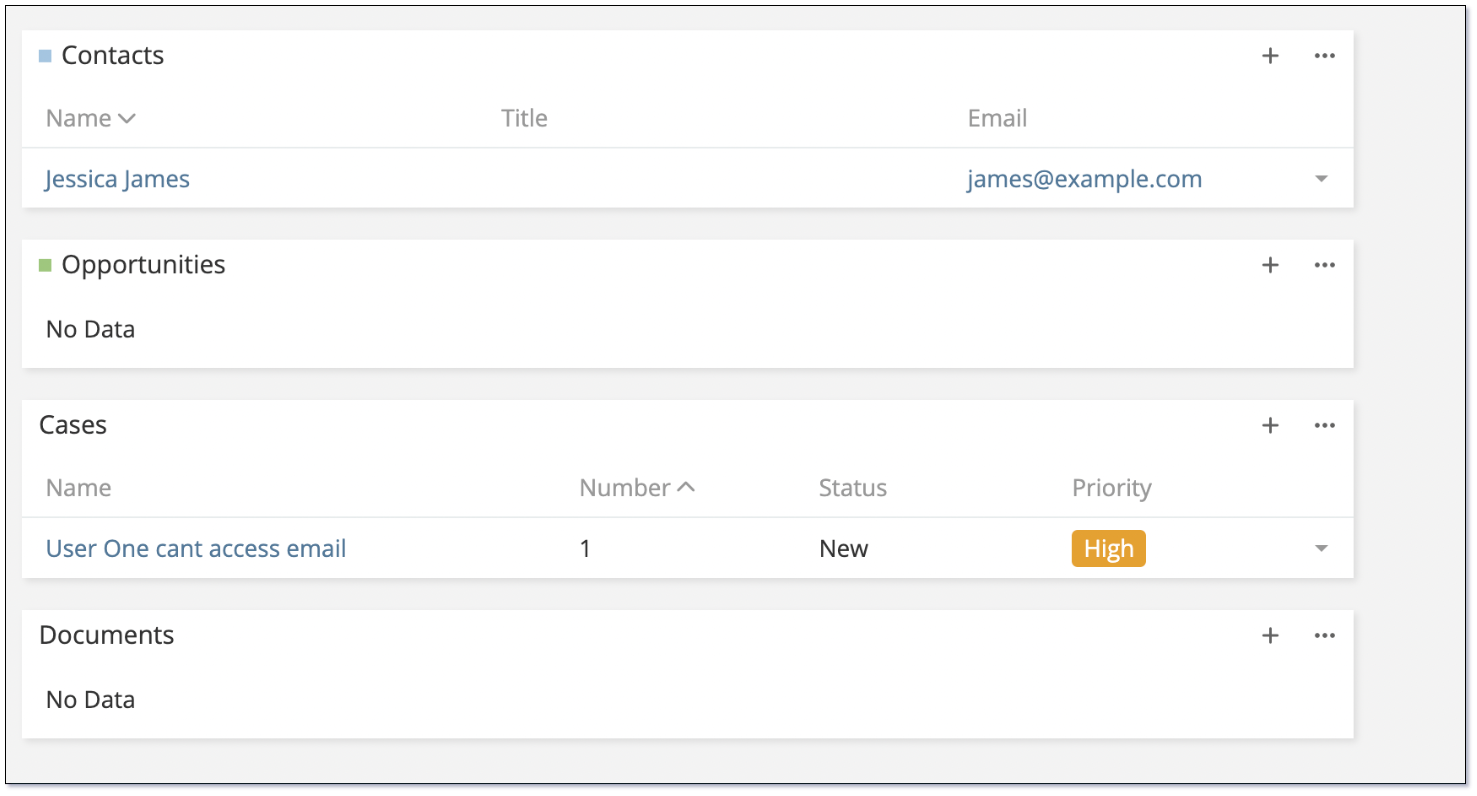
The Bottom Panel View is displayed at the bottom of Detail View to show records of all entities that share a relationship with one entity. i.e., when an Account relates to a Contact, a panel view can be set to show all contact records that relates to the Account in Account Detail View.
The following image shows the Panel View an Account record:
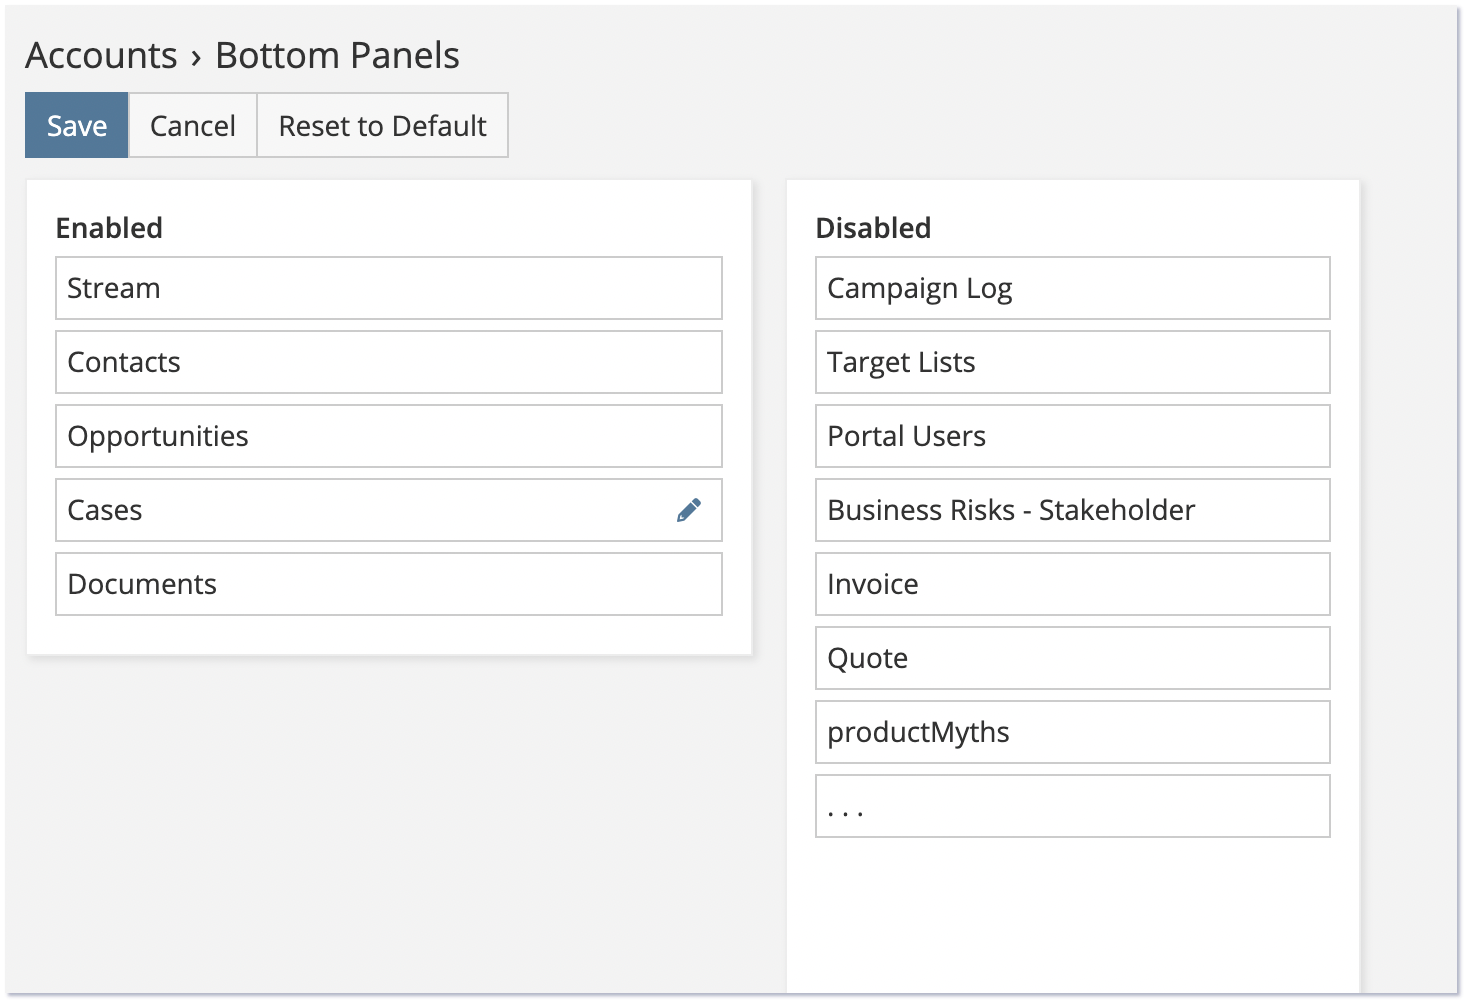
To modify what relationships can be shown as Bottom Panels:
- Click on an Entity to edit in Layout Manager. i.e., Account Entity
- Click on Bottom Panels. Select the relationship you wish to see as Bottom Panels by dragging it into Enabled column.
- Click the
Savebutton.
The following image shows how to modify Bottom Panel View:
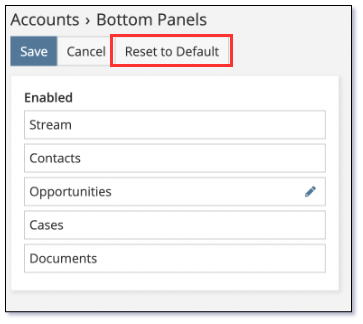
Resetting to Default
At any time you can reset the Bottom Panel View to the default layout by clicking the Reset to Default button as shown in the following image:
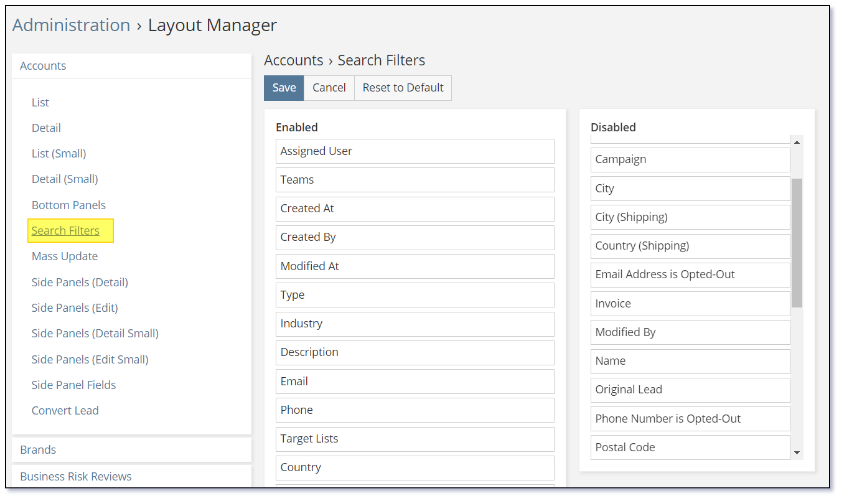
Search Filter View
The Search Filter View is displayed at the top of a List View, right next to the search box. Search Filter View allows administrators to configure which fields that can be used for filtering the list of records.
The following screenshot is an example of Search Filter View in Account entity:
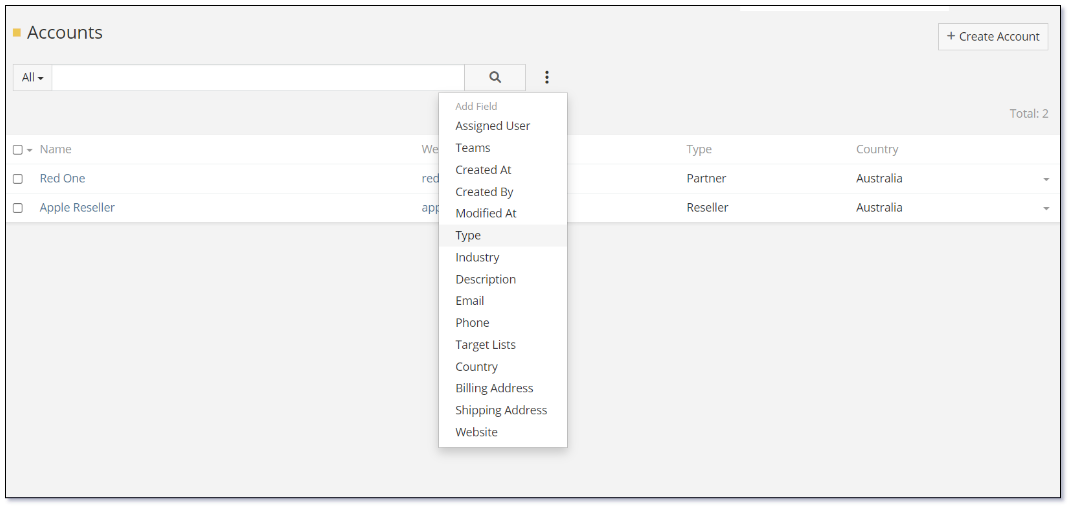
To modify which fields can be shown in Search Filter View:
- Click on an Entity to edit in Layout Manager. i.e., Account Entity
- Click on Search Filters
- Drag the fields you wish to include in Search Filters from Disabled section to Enabled section
- Click the
Savebutton.
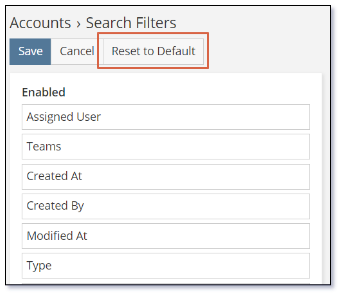
Resetting to Default
At any time you can reset the Search Filters View to the default layout by clicking the Reset to Default button as shown in the following image:
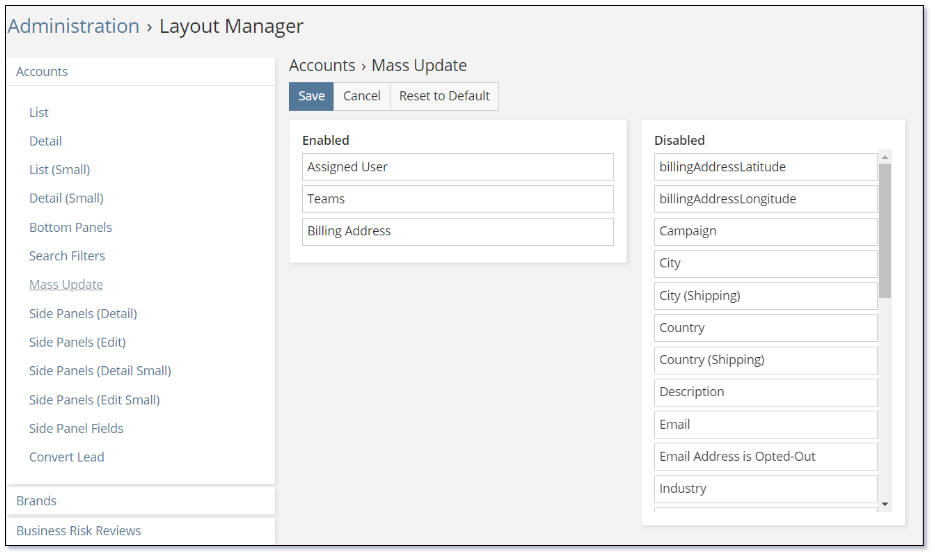
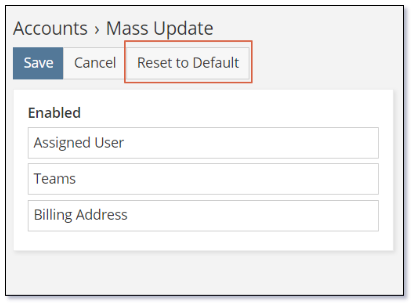
Mass Update View
Mass Update is an option to update a certain fields in bulk at the same time for all entities. Mass Update can be accessed via Entity List View by selecting a group of records, then click Action button and select Mass Update.
The following screenshot shows how to access Mass Update option.
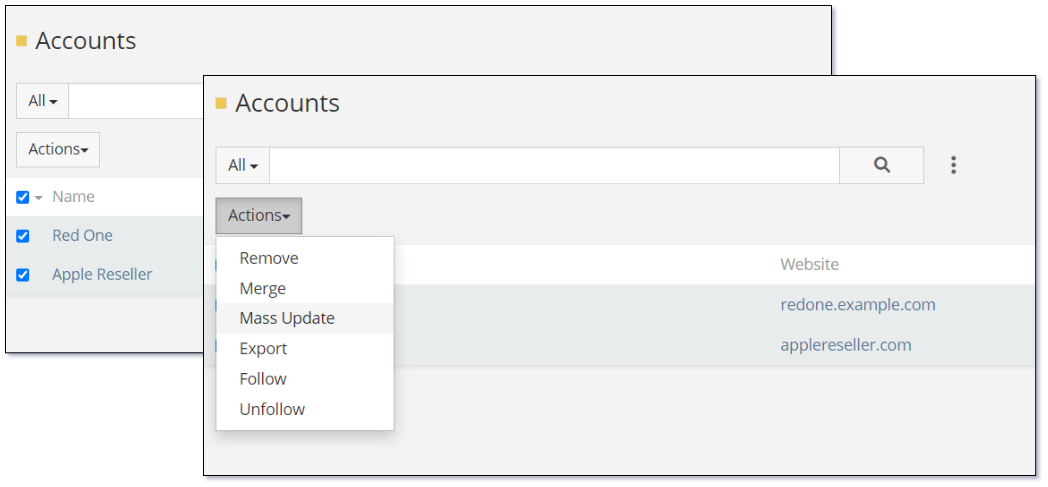
To modify which fields can be mass-updated:
- Click on an Entity to edit in Layout Manager. i.e., Account Entity
- Click on Mass Update
- Drag the fields you wish to include in Mass Update from Disabled section to Enabled section
- Click the
Savebutton.
Resetting to Default
At any time you can reset the Mass Update View to the default layout by clicking the Reset to Default button as shown in the following image:
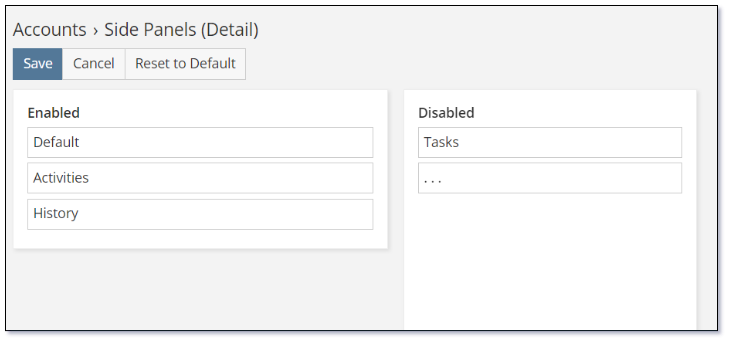
Side Panel Detail View
Side Panel view is displayed on the right panel when you click to view an entity record in details. Side Panel provides an ability to hide or re-order the list of panels: Activities, History, Tasks and others. To make more panels available, you need to select them at Side Panel Fields.
The following screenshot is an example of Side Panel
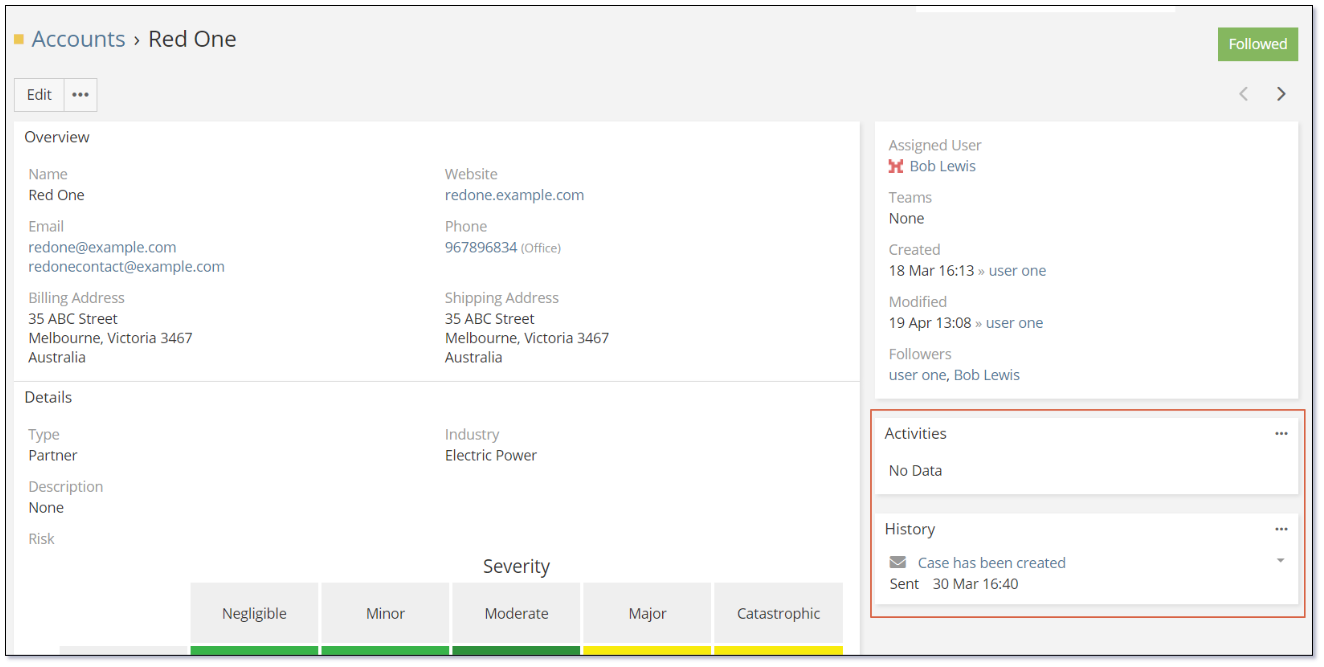
To configure Side Panel for detail view:
- Click on an Entity to edit in Layout Manager. i.e., Account Entity
- Click on Side Panel (Detail)
- Drag the fields you wish to include from Disabled section to Enabled section
- Click the
Savebutton.
Side Panel Edit View
This is similar to Side Panel Detail View, but it is used for Edit View when you wish to edit an entity record.
Side Panel Detail Small View
This is similar to Side Panel Detail View, but it is displayed in a Detail Small View. Please refer Detail Small View.
The following screenshot is an example of Side Panel Detail View
Side Panel Edit Small View
This is similar to Side Panel Detail Small View, but it is used for Edit View when you wish to edit an entity record.
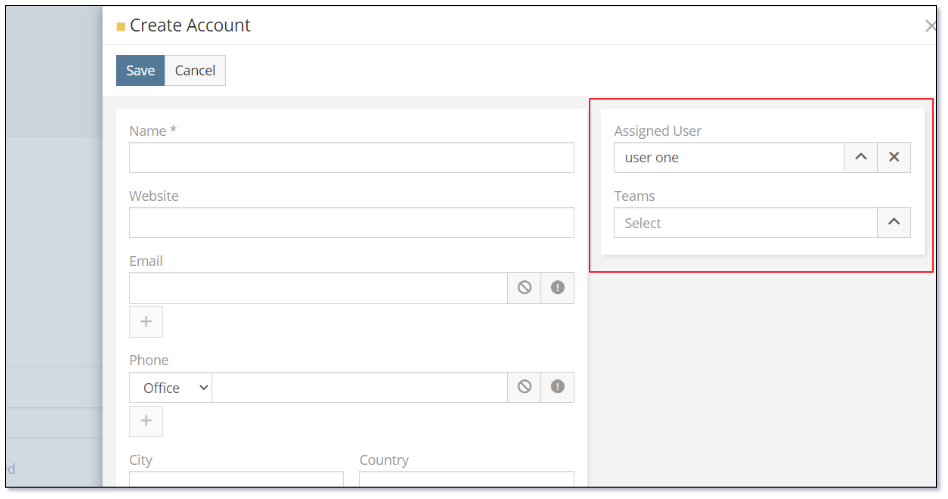
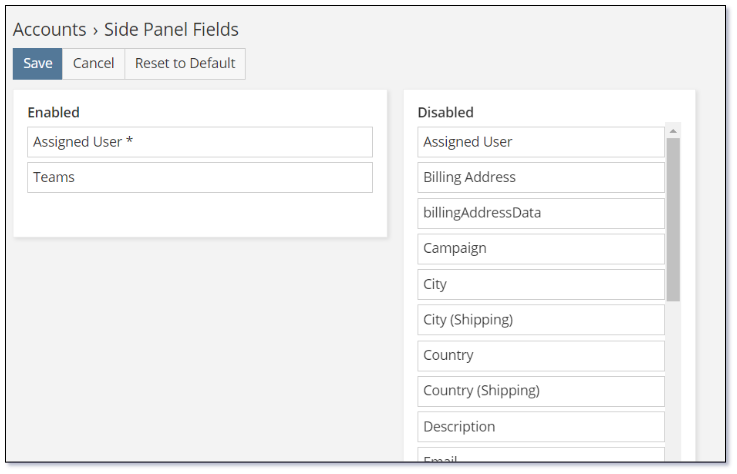
Side Panel Fields
Side Panel Fields allow you to configure which fields are available to be visible at a side panel. By default, Assigned User and Teams are available.
To configure Side Panel Fields
- Click on an Entity to edit in Layout Manager. i.e., Account Entity
- Click on Side Panel Fields
- Drag the fields you wish to include from Disabled section to Enabled section
- Click the
Savebutton.
Kanban View
Kanban is a tool in project management to visual work-in-progress, work and maximise the efficiency of a team. Mythradon provides Kanban View for any system or custom entities. To learn more about Kanban View click here Kanban View in Mythradon.
Note: The Kanban View is only available for entity with at least one dropdown list as the list will be used as statuses of the Kanban Board.
Convert Lead
Convert Lead is a specific view for presale entities only, including Accounts and Opportunities. To access Convert Lead view setting:
- Click on an Entity to edit in Layout Manager. i.e., Account Entity
- Click on Convert Lead
- The setting of Convert Lead is similar to Details View.
See also
- Mythradon Basics
- Mythradon Marketing
- Mythradon Sales
- Mythradon Service
- Mythradon System Administration
- Mythradon Tools