Mythradon Lead Capture Sample Form
Displayed below is a functional demonstration of a Web-to-Lead Capture form. This form is intentionally presented in its simplest HTML form, devoid of almost any CSS styling. The intent behind this HTML code is to offer a raw, unadorned sample that can be easily customised and styled to suit your specific needs.
The form utilises the JQuery JavaScript library to facilitate an AJAX (Asynchronous JavaScript and XML) submission. In this example the JQuery is sourced from the Google Content Delivery Network (CDN). If your website already incorporates JQuery, you may consider removing it from this form's code.
The resulting form will appear as follows:

The provided sample form will store a lead from your website directly into your Mythradon CSP system. To achieve this, please complete the following steps:
Note: In order to use the web form you will need to create a lead capture endpoint and insert the provided URL in place of
YOUR LEAD CAPTURE URLas indicated below.
Step 1 - Create a Lead Capture Entry Point
- Select
Administration | Lead Capturefrom the Menu Button - Click
Create Entry Point - Set the appropriate properties and click the
Savebutton. See the Properties Table below for more information.
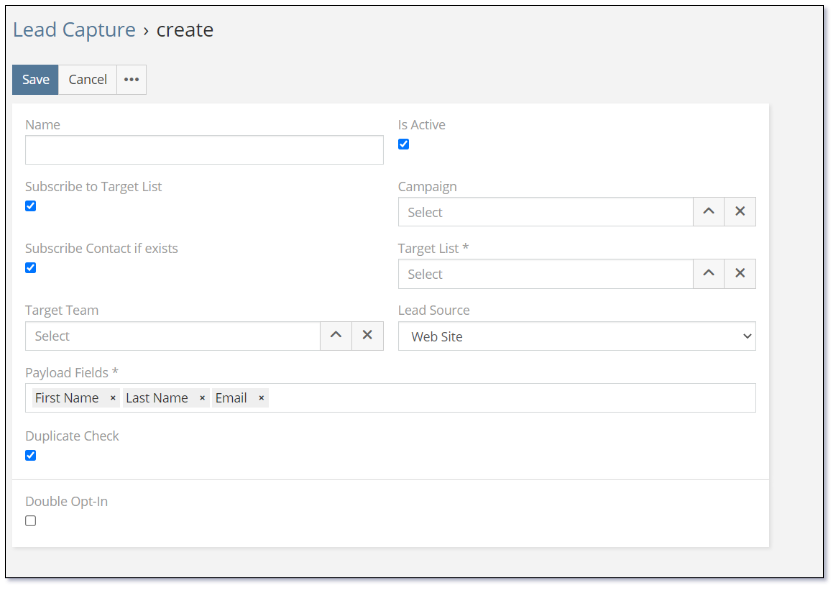
Properties
The following properties for creating a new Lead Capture Entry Point are as follows:
| Property | Description |
|---|---|
| Name | Name of the Entry Point. You can give it a friendly name to reflect your business process. |
| Is Active | A newly created Entry Point will be active by default. |
| Subscribe to Target List | The 'Subscribe to Target List' controls the specific Target List that the lead will be add to. |
| Subscribe Contact if exists | If you subscribe the Entry Point to a Target List, you can also subscribe it to Contact. The system will match the Leads with Contacts if exist. |
| Campaign | Assign the created leads to a Marketing Campaign. The statistics will be available in the log of a selected campaign record. |
| Target Team | Assign the created leads to a Team. |
| Lead Source | Define where a lead is captured, it could be a Website, Email, Call or more. |
| Payload Fields | What fields need to be sent in payload (from the web form to the API entry point). |
| Duplicate Check | Check whether a Lead exists, if yes, system will not create. |
| Double Opt-In | The 'Double Opt-In' feature determines whether the system should dispatch a confirmation email to the lead's email address. This email enables the recipient to confirm their registration as a lead in your system. |
| Create Lead before confirmation | Controls if a Lead record should be created before Double Opt-In confirmation. |
| Skip confirmation if lead is already in target list | Controls if the double opt-in process should be skipped if the lead already exists in the Target List. |
| Opt-in confirmation email template | Defines the email template to use for the Double Opt-In email. |
| Opt-in confirmation lifetime (hours) | The 'Opt-in confirmation lifetime (hours)' establishes the duration during which the Double Opt-In email remains valid. |
| SMTP Account | SMTP Email Account which will be used to send the Double Opt-In Email. |
| Text to show after opt-in confirmation | Text to display after the Double Opt-In confirmation. |
Note: Our form assumes the selection of the following Payload fields:
First Name,Last Name,
Step 2 - Copy Lead Capture Entry Point URL
Once you save the Lead Capture Entry Point, Mythradon will display the HTTP request details on the Lead Capture Entry Point right side panel as shown:

The URL value will need to be used in replacement of the action attribute used in the html code of step 3.
Step 3 - Create HTML Web Page
Using your text editor of choice, copy and paste the following html code into a new web page.
If additional fields are required, ensure to add them to the Payload Fields of the Lead Capture Endpoint.
Replace the text action="**YOUR LEAD CAPTURE URL**" with the URL value from the previous step and save the file to your web server.
This form will submit the values to your Mythradon system via a HTTP POST.
Note: Ensure to include html start and end tags.
<script src="https://ajax.googleapis.com/ajax/libs/jquery/3.7.1/jquery.min.js"></script>
<style>
    label{
        display:inline-block;
        min-width:150px;
    }
</style>
<div>
    <form id="contact-form" method="post"
        action="**YOUR LEAD CAPTURE URL**">
        <div>
            <div id="contact-form-result">
            </div>

            <div>
                <label for="firstName">First Name</label>
                <input id="firstName" type="text" name="firstName" required="required" maxlength="50">
            </div>

            <div>
                <label for="lastName">Last Name</label>
                <input id="lastName" type="text" name="lastName" required="required" maxlength="50">
            </div>

            <div>
                <label for="emailAddress">Email</label>
                <input id="emailAddress" type="email" name="emailAddress" required="required" maxlength="100">
            </div>

            <div>
                <label for="phoneNumber">Phone</label>
                <input id="phoneNumber" type="text" name="phoneNumber">
            </div>

            <div>
                <label for="description">Message</label>
                <textarea id="description" rows="4" name="description" required="required" maxlength="5000"></textarea>
            </div>
            <div>
                <input type="submit" id="submit-contact-form">
            </div>
        </div>
    </form>

    <script>
        $("#contact-form").submit(function (e) {

            e.preventDefault(); // avoid to execute the actual submit of the form.

            var form = $(this);
            var actionUrl = form.attr('action');
            $("#submit-contact-form").attr("disabled", true);

            $.ajax({
                type: "POST",
                url: actionUrl,
                data: form.serialize(), // serializes the form's elements.
                success: function (data) {
                    debugger;
                    $('#contact-form').trigger("reset");
                    $('#contact-form-result').html('Thank you, we will be in contact.');
                    $("#submit-contact-form").attr("disabled", false);
                },
                error: function (xhr) {
                    $('#contact-form-result').html('An error has occured please try again later');
                    $("#submit-contact-form").attr("disabled", false);
                },
            });

        });

    </script>
</div>
Step 4 - Test the Web-to-Lead Form
Open the newly created web page in your browser. Complete the details in the form and click the Submit button.
When the record is successfully saved, a success message will appear: 'Thank you, we will get in touch.' The form fields will be reset, making it ready for another submission.
To check that the lead was created, select Leads from the main menu and confirm that the record you submitted on the form has been created.
See also
- Mythradon Basics
- Mythradon Marketing
- Mythradon Sales
- Mythradon Service
- Mythradon System Administration
- Mythradon Tools